Do you know you can limit the access to a specific directory with a password?
This feature enables you to protect a directory if you want to limit the access of your website directory to a selected number of people. Once this is enabled, a user who tries to open a protected folder will be prompted to enter a username and password before they can access the content.
How to configure a Password for a directory?
Setting up a password protected directory is fairly easy. To add password protection to a directory, follow these steps:
Step 1: Log into your cPanel.
Step 2: Under the Security section, click on the “Password Protect Directories” icon
Step 3: Select the directory that you wish to open and then click on the “Go” button.
Step 4: Click the name of the folder that you wish to protect to select it. Click a folder’s icon to open it.
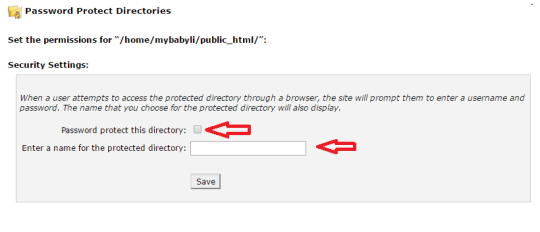
Step 5: Click on the “Password protect this directory” checkbox and enter the name for a protected directory.
Step 6: Next, click on the “Save” button below.
Step 7: Click on the “Go Back” button.
Step 8: Under “Create User”, create a username and password to access this directory.
Password Protected
Done! You have successfully configured a password for a directory now.
To have a second check, launch your browser and view the directory to ensure your directory has been password protected. If the browser prompts you to login, then your folder has been password protected.
Have a try! Till then, see you in the next entry. Cheers!
Read more about cPanel and learn how to login cPanel as a beginner.


